
Those of us who love vintage earrings are often frustrated to find that a newly-acquired pair is unbearably uncomfortable because of its screw-back or clip-back fitting. If this were an occasional issue it wouldn’t be a big deal; however for the first three-quarters of the 20th century pierced earrings were out of fashion in many parts of the world. For me, this time period encompasses many of my favorite styles of earrings: long, elegant Art Deco earrings; Mexican silver hoops and enameled earrings; sculptural Modernist earrings; and dangling 60’s mod earrings. While a jeweler can convert almost any pair of earrings to pierced, the cost runs at least $20-50 and sometimes higher. While this is worth doing on some earrings, it can get prohibitively expensive.
Fortunately, there are easy and economical ways to convert some of these vintage earrings to pierced with just a few simple tools, minimal skill, and very little time. These do-it-yourself conversions work best on dangling earrings that have simple surmounts (the part of the earring that attaches to the ear) with either a single rhinestone, a silver ball or half-round, or a silver and marcasite surmount.
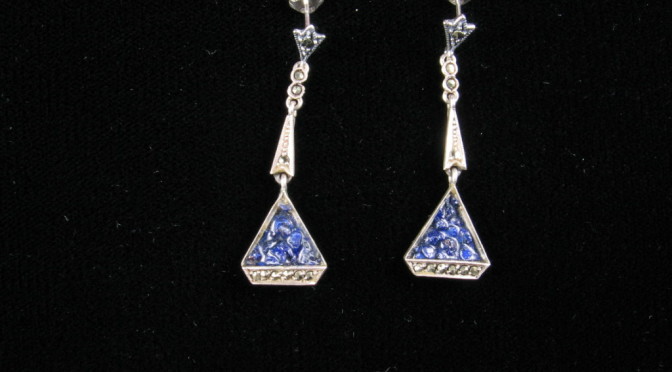
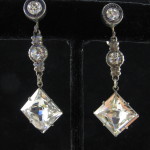
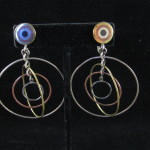
At the top of this post are some examples of vintage earrings that would be suitable candidates, or that I’ve already converted. Below are some examples of vintage screw-back surmounts that I’ve removed from earrings and some options for their replacement:
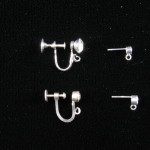
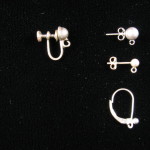
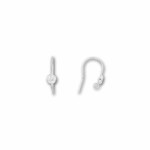
The photo on the left shows two different rhinestone screw-back surmounts and two sizes of cubic zirconia (CZ) surmounts that can successfully be used to replace them. The photo on the right shows a half-round silver screw-back surmount removed from a pair of vintage Mexican earrings and three styles and sizes of posts and ear wires that could be used to replace it.
Pierced surmounts can be found at bead shops, at gem and bead shows, or online. I’ve had a lot of luck finding silver ball replacements at local bead shops and gem and bead shows but less luck finding rhinestone and marcasite ones there. I’ve had better luck finding surmounts with CZ’s and marcasites online.
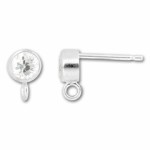
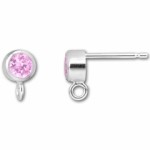
My favorite source for CZ surmounts is Artbeads.com. They carry several sizes, colors, and finishes of posts and earwires with CZ’s. Here are a few examples, but there are many more available online:
A good source for sterling surmounts with marcasites is Dreambell on Amazon. The style that they carry is terrific for converting Art Deco marcasite earrings from screw-backs to posts. I’ve also found Dreambell to be a good source for sterling and gold-filled ball surmounts in several sizes:
How to do it:
Tools: you need a few basic tools to replace the surmounts. Jeweler’s pliers are essential. They come is several styles: round-nosed, flat-nosed, and chain-nosed. A set can be bought for under $20. For seeing such small details you may also need an optivisor which will give you high magnification and leave your hands free to work. And finally, a polishing cloth – Sunshine cloths are my favorite brand – will help you meld your vintage dangle and new surmount together.

Here is a wonderful pair of vintage earrings that I recently acquired. Believe it or not, they were dangling as pendants from a beaded necklace but, when I saw the necklace at an estate sale, I immediately recognized them as Art Deco earrings. The original surmounts had been drilled with holes for hanging them on the necklace and the screwback removed so, in order to make them wearable again as earrings I needed to attach new surmounts. Here is is a step-by step demonstration of how to replace the surmounts:

Surmounts are connected to the dangling portion of the earring by a little loop. In most cases this loop has a fine split joint which can be opened and slipped off the dangling portion. Occasionally this loop is soldered and there is a small jump ring attaching the dangling portion, in which case the jump ring should be opened to remove the surmount. To remove the original surmount hold it in your hand and gently rotate the split loop with the round-nosed pliers until there is a big enough opening for the dangle to slip out.


If the split loop on your new surmount isn’t already open, open it just like you did to remove the old one. Holding the new surmount in your hand or pliers slip the dangle onto the open loop and close it using the round-nosed pliers. If your new surmount is a lot shinier than your dangle give the dangle a light polish with your Sunshine cloth. Your surmount may still be shinier than the old dangle but I don’t recommend applying chemicals to darken the surmount or over-polishing the dangle because you could damage them. Over time your new surmount will tarnish and blend in perfectly. In the case of these earrings there is a slight difference in tone between old and new, but it’s not significant so I’ve not done any polishing. The entire replacement took me less than 5 minutes.
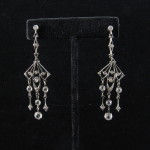
There are some types of vintage earrings for which I don’t recommend this type of do-it-yourself replacement. These include earrings in which the surmount is an integral part of the design and those where the makers mark is on the surmount and replacing it or altering it will significantly affect the value. Here are a few of examples:

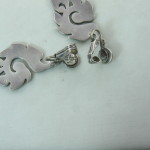
The earrings on the left still have the original screw-backs, but would be suitable for a jeweler to attach a post. In the middle photo I had a jeweler remove the screw-backs from the earrings and solder on posts. The earrings on the right are by Margot de Taxco and her maker’s mark is on the surmount right where a post would be soldered, and would be obscured if a jeweler added a post. This would affect the value of the earrings so it is important to be aware of this when making a decision to modify the earrings.
I hope this post has helped by providing you with resources for tools and supplies, and with instructions.
ShareFollow
I gave my daughter a pair of SS Ming’s screw back earrings. She would like to wear them, but finds the screw backs uncomfortable. Any suggestions?
I don’t suppose you have instructions on how to change dangly earwire earrings to post style earrings do you? My holes were torn when I was a child, and while the hole has closed up well the scar is still there and dangle earrings look terrible on me.
Good day! I just want to offer you a huge thumb up for your excellnt info you’ve got here on this post.
I am coming back to your web site for more soon.
Thank you Edison.
Lisa
Hi, Lisa:
I have a pair of screw back earrings – each is a single cultured pearl glued (I am assuming ) to the screw back. The shape of the piece to which the pearl is attached is curved to receive the curve of the pearl. Would I be able to make studs from these? I priced out a conversion at a jeweler’s. They want $110.00 to do this – probably far more than the two pearls are worth.
Hi Barbara,
You should be able to make this repair yourself. What you need to get is a pair of posts designed for pearls and other stones. If you Google “earring posts for pearls” several suppliers will turn up. Here’s one that I’ve used before: http://www.ottofrei.com/Lightweight-Pearl-and-Stone-Posts-2.5mm-Cup-with-Peg.html
A couple of things to keep in mind:
-Before you order new posts, make sure you can get the pearls off the screwbacks. Depending on the glue used to glue your pearls to the screwbacks it may be very easy or very hard to remove the pearls from their current screw back. I’d take an x-acto type thin-bladed utility knife and carefully work it into the edges between the pearl and the curved piece of metal. The pearls are most likely have a single drilled hole and will have a small post on which they are attached so if you can, once they are loosened try to rotate them to break the glue seal around the post .Because pearls are chemical-sensitive you don’t want to apply any harsh chemicals to them to try to dissolve the glue.
-The curved part is called a “cup” and you need to order the new posts based on the size of the pearls so that you get a nice tight glue seal. So measure your pearls before you order new posts. Pearls are measured in millimeters.
-You can use epoxy or a glue called Vigor, that you can buy from Otto Frei and many bead stores.
Hope this helps,
Lisa
Utter brilliance! And just what I was searching for! I started limiting my searches for pierced earrings, but it’s so …well, limiting. I miss out on beautiful pieces that way, so I’ve gone back to searching for any and all before 1960. I find English made items to have a better ratio of early pierced earrings.
I enjoy jewelry of all sorts from the Georgian through Art Deco years, Victorian especially, with a minor obsession in Bohemian Garnets, rose gold, and Pools of Light. I enjoy rock crystal in any shape or piece though.
Hi Ruby, I’m glad this article was helpful to you.
Lisa